Installing the Arduino IDE including ESP8266 support
For the IoT Lab at the Developer UnConference in January in Zurich this is how you should prepare your laptop or Mac:
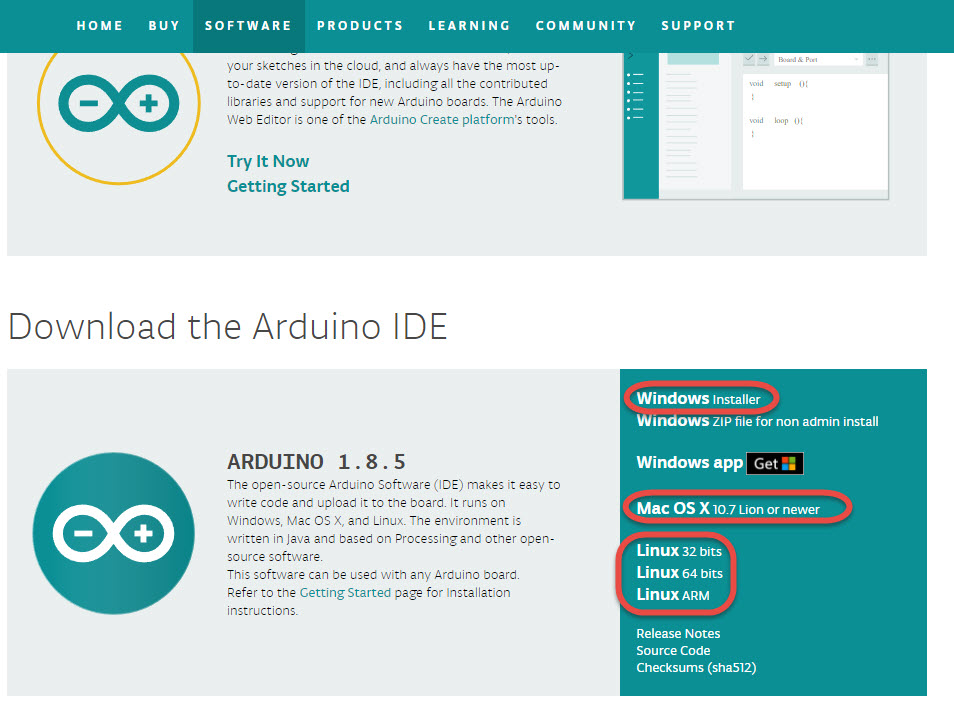
Install the Arduino IDE from https://www.arduino.cc/en/Main/Software.
Chose your platform and install:
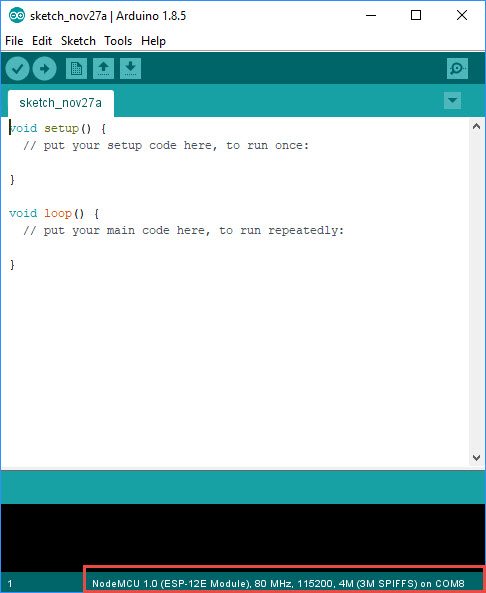
Startup the Arduino IDE. It should look like that:
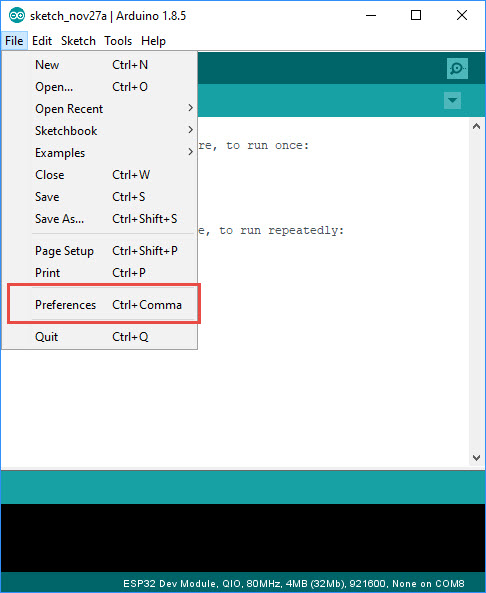
Goto “Preferences”:
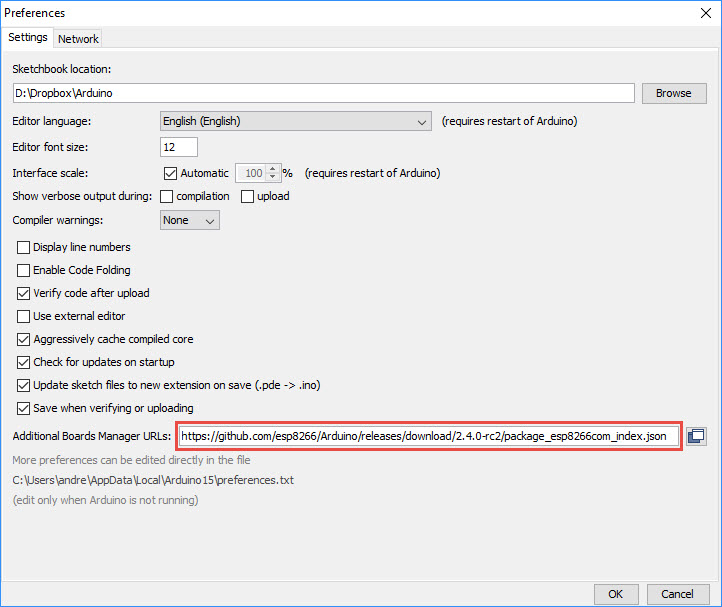
Fill-in this string into this field:
https://github.com/esp8266/Arduino/releases/download/2.4.0-rc2/package_esp8266com_index.json
And hit ok.
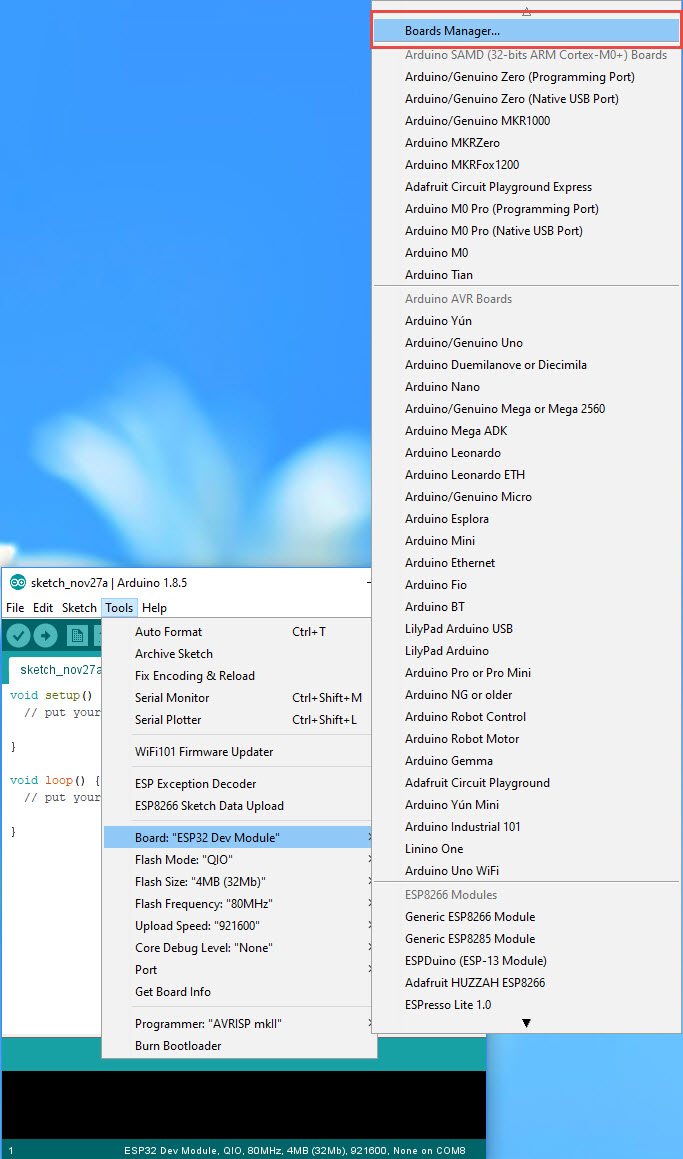
Go to “Tools->Board:->Boards Manager”:
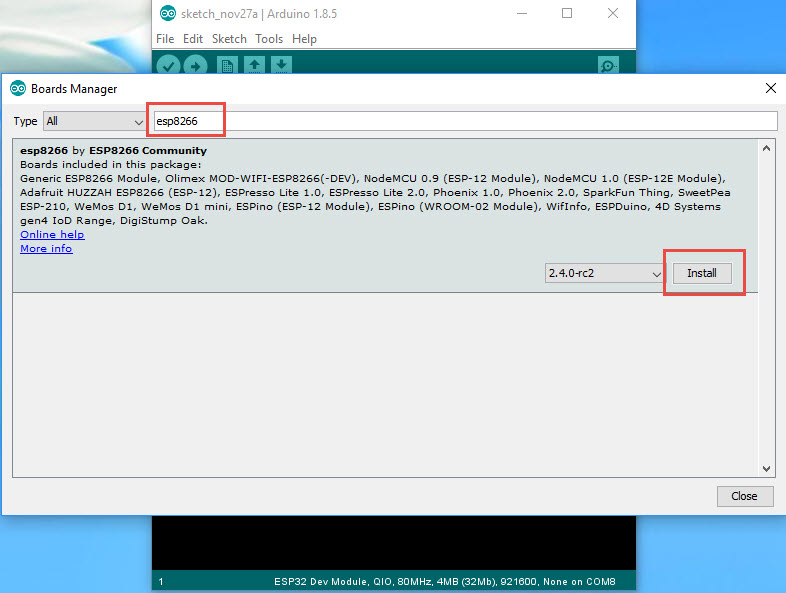
And search for “ESP8266”:
Check if a 2.4 release is selected and hit “Install”. Wait till everything is installed and hit “Close”.
Now the support for the ESP8266 chips should be installed.
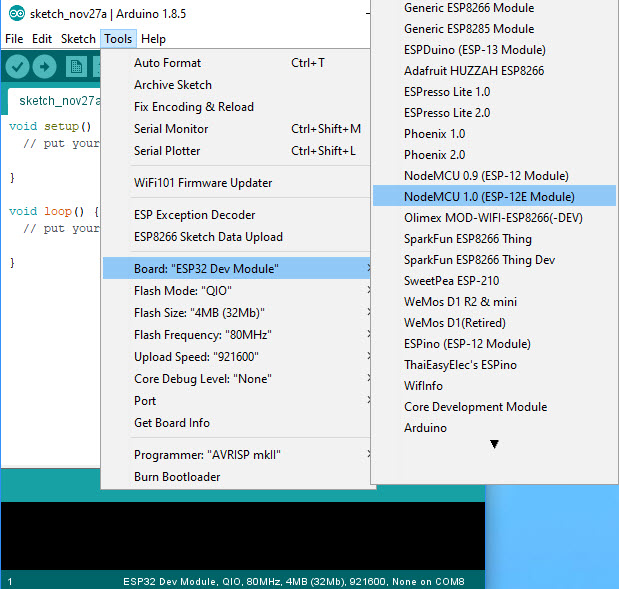
Go back to Tools and boards and scroll until you find “NodeMCU 1.0” and select the line:
The Window will close and you should see the board in the bottom right corner of the IDE window.
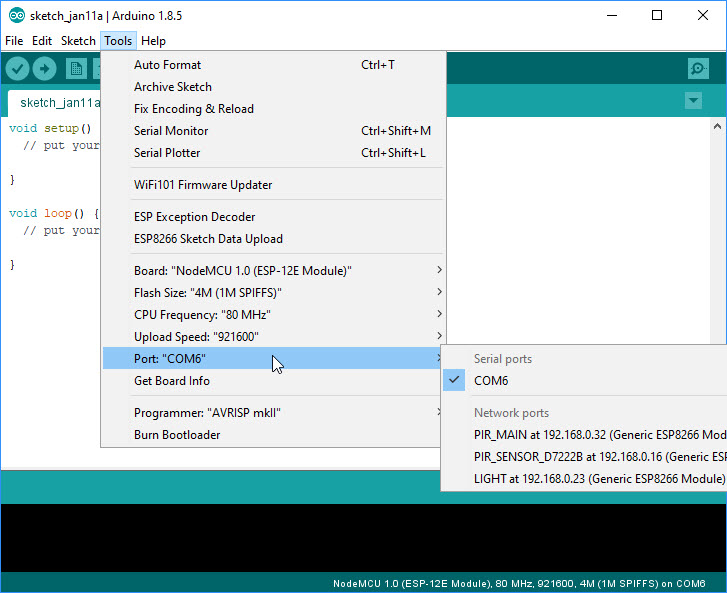
Now you have to select or check the COM port:
And you see it also in the bottom right corner.
The COM port is probably not the same as on my computer. No worry.
For Mac users:
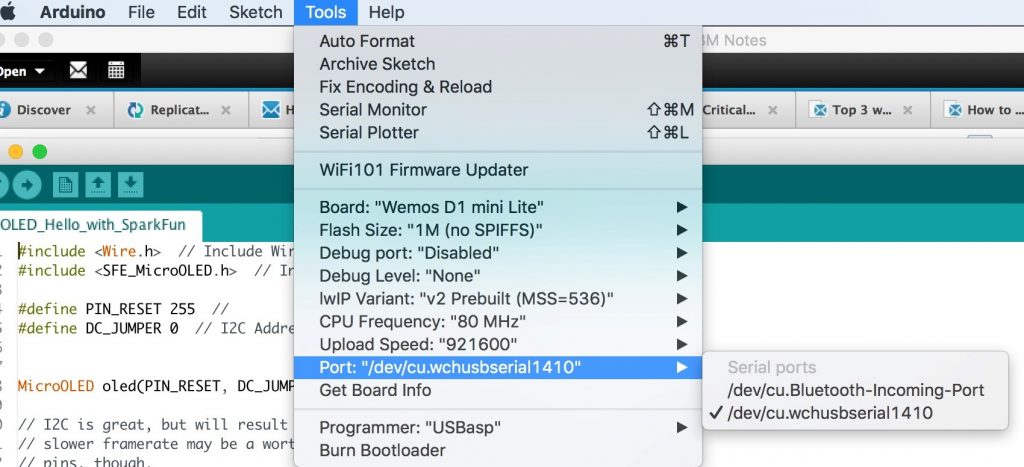
Connect the WeMos Shield to the MacBook USB port.
Check whether the WeMos Shield Board shows up on the USB port by using the following commands in a terminal session
$ ls /dev/cu.*
/dev/cu.Bluetooth-Incoming-Port
$ ls /dev/tty.*
/dev/tty.Bluetooth-Incoming-Port
If you get only these result of the ls command the WeMos Shield does not show up and you should install the USB driver. To do this follow the link in this description:
see here https://github.com/adrianmihalko/ch340g-ch34g-ch34x-mac-os-x-driver
(first, run the commands to remove the driver, the I used the procedure to install the driver using the installation with Homebrew-Cask).
You have to reboot your MacOS and with a connected WeMos Shield on the USB port you should get the following result
$ ls -lart /dev/cu*.*
crw-rw-rw- 1 root wheel 21, 1 Jan 9 08:06 /dev/cu.Bluetooth-Incoming-Port
crw-rw-rw- 1 root wheel 21, 7 Jan 10 06:55 /dev/cu.wchusbserial1410
$ ls -lart /dev/tty*.*
crw-rw-rw- 1 root wheel 21, 0 Jan 9 08:06 /dev/tty.Bluetooth-Incoming-Port
crw-rw-rw- 1 root wheel 21, 6 Jan 10 06:55 /dev/tty.wchusbserial1410
And in the Arduino IDE you should see the board
Continue with Windows and Mac:
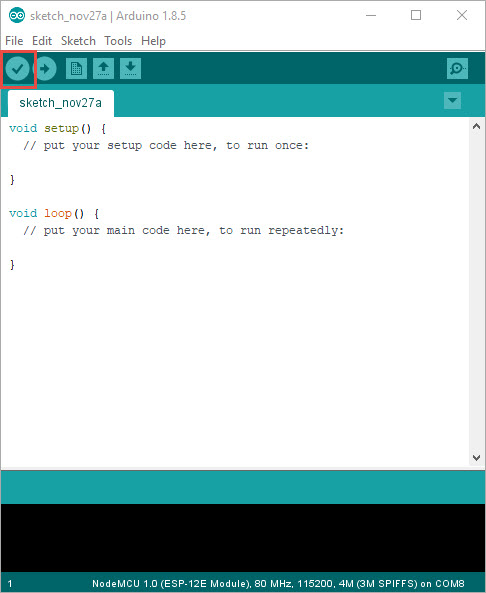
Now you hit the “OK” button and the sketch should compile:
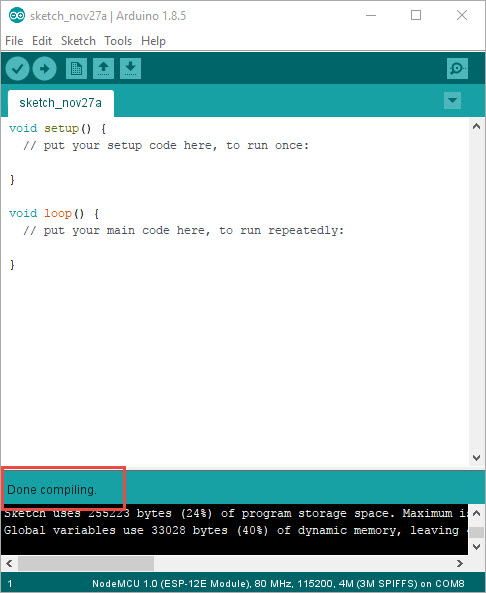
After a while, you should see “done compiling”:
Congratulations: This is your success message and you are ready to program an ESP8266 chip.
12. December 2017 @ 4:39
Hi
We are working on a cost effective solution to extend the range of LORA for our application. We are trying to implement LORA in a mesh network, therefore, one node can send its signal to its neighbor nodes and after several attempts to the gateway. Actually, we want to put nodes every 500/1000 meters and have one gateway for each 10km*10km area. Do you think working on LORA to make it a mesh network makes sense or we should change the communication protocol? What would you do if you wanted to build such a system?
Thanks,
Hamed
5. January 2018 @ 16:01
I think LoRa is a good communication protocol for slow speeds. Mesh will reduce this speed and you have to decide if it is fast enough. Maybe a “relay” type of network is a better approach if you have a mountain close to your devices. Would be much easier and line of sight, LoRa works over many kilometers or miles. Most Amateur Radio concepts also depend on this kind of architecture.
17. January 2018 @ 7:34
Hi Andreas,
Great idea to open a blog!! I love your videos but I much appreciate the text interface (I guess it is also linked to my pre-web education). It is a very good complement to your YouTube channel even though I understand the tremendous quantity of work invested to reach this level of quality.
I promise, from now on, I’ll always shop through the links on your page 😉
I teach IoT development on various MPUs and MCUs, now I’m preparing a “Do your own sensor” unconference for absolute beginners and your shared experience with Wemos is very valuable. Hope I’ll have time to contribute on IoTAppStory.
Cheers, Thierry
21. January 2018 @ 0:33
Hi Thierry,
I try to update documentation as soon as I have time.
Regards
Andreas
19. February 2018 @ 16:23
Hi Andreas,
Would you be interested in doing a product review for us? We’ve built a USB charger that we’re launching on Kickstarter and we’d love for you to take a look. It’s pirlcharger.com and it’s unique because for the first time you don’t need a multimeter to know power draw – we’ve built in a wattmeter.
Thanks,
Kobby
20. March 2018 @ 10:51
Hello Andreas,
i enjoy your videos but im not and never going to be a coder, but Node red has got me very interested.
If possible are you able to produce some more videos dedicated towards node red and show how the dash is viewed on the iphone.
i have a few projects in mind using ESP32 with rasp Pi
Thanks for considering any future videos
Kind regards
Darren
Melbourne
Australia
3. April 2018 @ 18:03
Hello Andreas.
I make a query not just about this particular blog but rather about a problem I have with the esp8266 modules and the possibility of controlling the exceptions. I am using a module and I need you to send some information once a day for 4 months and the rest of the time it must be in deepsleep.
I found that from one day to another the battery was dead and when I could do a debug I found that it was in installation mode with which the battery was consumed quickly and the module was paused. Only a manual reset takes it out of that state.
I wanted to ask you if you had a similar problem and if so you could solve it.
Thank you very much.
Your videos are very good, I like them a lot.
6. August 2018 @ 14:11
Hi to all. Just to let you know that only a couple of days ago, version 2.4.2 for the ESP8266 core was announced on GitHub https://github.com/esp8266/Arduino/releases . Some Arduino IDE boards manager won’t find the update, since the url in the preferences file will still be looking for version 2.4.1…
I tried to install version 2.4.2 manually, but it’s better to change the url in the Arduino IDE prefs to: https://github.com/esp8266/Arduino/releases/download/2.4.2/package_esp8266com_index.json, close the program, restart it, and then let the boards manager update automatically.
3. December 2018 @ 10:08
Dear Andreas,
Would you be interested in helping a dutch startup developing a cool (and relevant) new product? If yes please feel free to contact me for further details.
Best regards,
Huub
14. April 2019 @ 11:57
YouTube is my hobby and I do no consulting.
2. April 2019 @ 17:31
Hello, Andreas.
My name is Fernando Koyanagi. I’m from Brazil.
I have a channel on Youtube, in Portuguese, in which I talk a lot about ESP32, IOT, electronics, among other subjects.
I am an admirer of your work and follower of your channel, the quality of the projects and the creativity you have.
I would like to propose a video in partnership with you.
Are you interested?
This is my channel: http://www.youtube.com/fernandokoyanagi
I await reply!
26. January 2021 @ 22:53
Hi Andreas,
Please accept a small $500 gift as a recognition of your work on ESP8266, and Arduino technologies.
zumungo.com
provides software for control of relays, stepper motors and keypads all based on many years of hands on filed experience. You’ll be surprised how many ways there are to manage a Relay. Works with ESP8266 and ESP32 based boards.
The coupon code below allows for no cost use of the software and is worth $100 to the first 5 users who use it. Unused portion rolls over to the next purchase allowing to try all 3 products at no cost.
We will be trilled if you manage to find the time and try it. You won’t be disappointed.
Coupon code: E6JKJUY7
Best regards,
The team at zumungo.com